ModelAndViewクラスの利用
ModelAndViewクラスは、データとビューに関する情報をまとめて管理できる。
package jp.abc;

import org.springframework.stereotype.Controller;
import org.springframework.ui.Model;
import org.springframework.web.bind.annotation.PathVariable;
import org.springframework.web.bind.annotation.RequestMapping;
import org.springframework.web.servlet.ModelAndView;

@Controller
public class IndexController {

	@RequestMapping("/index/{num}")
	public String index(@PathVariable int num, Model model) {
		int res = 0;
		for (int i = 1; i <= num; i++) {
			res += i;
		}
		model.addAttribute("msg", "total: " + res);
		return "index";
	}

	@RequestMapping("/mav/{num}")
	public ModelAndView mav(@PathVariable int num, ModelAndView mav) {
		int res = 0;
		for (int i = 1; i <= num; i++) {
			res += i;
		}
		mav.addObject("msg", "total: " + res);
		mav.setViewName("index");
		return mav;
	}
}
フォームを利用したデータの送信
コントローラは、HTTPメソッドのGETとPOSTを区別して受信するように、それぞれにメソッドを用意する。
package jp.abc;

import org.springframework.stereotype.Controller;
import org.springframework.ui.Model;
import org.springframework.web.bind.annotation.PathVariable;
import org.springframework.web.bind.annotation.RequestMapping;
import org.springframework.web.bind.annotation.RequestMethod;
import org.springframework.web.bind.annotation.RequestParam;
import org.springframework.web.servlet.ModelAndView;

@Controller
public class IndexController {

	@RequestMapping("/index/{num}")
	public String index(@PathVariable int num, Model model) {
		int res = 0;
		for (int i = 1; i <= num; i++) {
			res += i;
		}
		model.addAttribute("msg", "total: " + res);
		return "index";
	}

	@RequestMapping("/mav/{num}")
	public ModelAndView mav(@PathVariable int num, ModelAndView mav) {
		int res = 0;
		for (int i = 1; i <= num; i++) {
			res += i;
		}
		mav.addObject("msg", "total: " + res);
		mav.setViewName("index");
		return mav;
	}

	@RequestMapping(value="/form1", method=RequestMethod.GET)
	public ModelAndView form1(ModelAndView mav) {
		mav.setViewName("form1");
		mav.addObject("msg", "お名前を書いて送信してください");
		return mav;
	}

	@RequestMapping(value="/form1", method=RequestMethod.POST)
	public ModelAndView send(@RequestParam("text1")String str,
			ModelAndView mav) {
		mav.addObject("msg", "こんにちは" + str + "さん!");
		mav.addObject("value", str);
		mav.setViewName("form1");
		return mav;
	}
}
HTMLを用意する。
テキストではindex.htmlを修正して再利用しているが、ここでは新たにform1.htmlを作成する。
<!DOCTYPE html>
<html xmlns:th="http://www.thymeleaf.org">
<head>
<meta charset="UTF-8">
<title>top page</title>
<style type="text/css">
	h1 {
		font-size: 18pt;
		font-weight: bold;
		color: gray;
	}
	body {
		font-size: 13pt;
		color: gray;
		margin: 5px 25px;
	}
</style>
</head>
<body>

<h1>form1</h1>

<p th:text="${msg}">please wait...</p>
<form method="post" action="/form1" >
	<input type="text" name="text1" th:value="${value}" />
	<input type="submit" value="Click" />
</form>

</body>
</html>
診断メーカーっぽくしてみよう!
HTMLに入力フィールドを追加する。
<!DOCTYPE html>
<html xmlns:th="http://www.thymeleaf.org">
<head>
<meta charset="UTF-8">
<title>top page</title>
<style type="text/css">
	h1 {
		font-size: 18pt;
		font-weight: bold;
		color: gray;
	}
	body {
		font-size: 13pt;
		color: gray;
		margin: 5px 25px;
	}
</style>
</head>
<body>

<h1>form1</h1>

<p th:text="${msg}">please wait...</p>
<p th:text="${result}">please wait...</p>
<form method="post" action="/form1" >
	<input type="text" name="text1" th:value="${value}" /><br />
	<input type="text" name="text2" th:value="${text2}" /><br />
	<input type="submit" value="Click" />
</form>

</body>
</html>
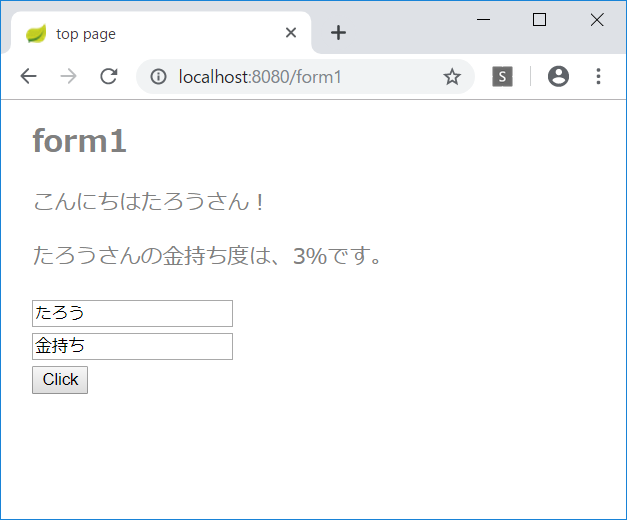
受け取ったテキストで診断して結果を0~100%の範囲で返す。
	@RequestMapping(value="/form1", method=RequestMethod.POST)
	public ModelAndView send(@RequestParam("text1")String str,
			@RequestParam("text2")String str2,
			ModelAndView mav) {
		int p = (str + str2).hashCode() % 101;
		p = Math.abs(p);
		mav.addObject("msg", "こんにちは" + str + "さん!");
		mav.addObject("result", str + "さんの"
							+ str2 + "度は、" + p +"%です。");
		mav.addObject("value", str);
		mav.addObject("text2", str2);
		mav.setViewName("form1");
		return mav;
	}
診断の結果を表示できるようになった。
そのほかのフォームコントロール
コントローラが長くなってきたので、新しくコントローラを作成する。
FormController
package jp.abc;
import org.springframework.stereotype.Controller;
import org.springframework.web.bind.annotation.RequestMapping;
import org.springframework.web.bind.annotation.RequestMethod;
import org.springframework.web.bind.annotation.RequestParam;
import org.springframework.web.servlet.ModelAndView;
@Controller
public class FormController {
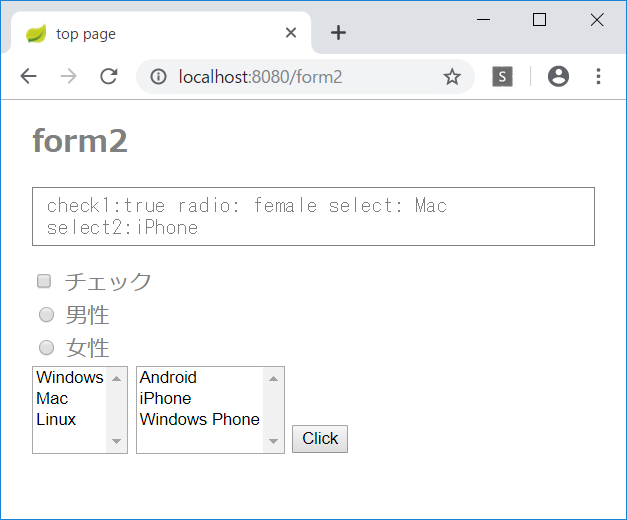
@RequestMapping(value="/form2", method=RequestMethod.GET)
public ModelAndView form2(ModelAndView mav) {
mav.setViewName("form2");
return mav;
}
@RequestMapping(value="form2", method=RequestMethod.POST)
public ModelAndView send(
@RequestParam(value="check1", required=false)boolean check1,
@RequestParam(value="radio1", required=false)String radio1,
@RequestParam(value="select1", required=false)String select1,
@RequestParam(value="select2", required=false)String[] select2,
ModelAndView mav) {
String res = "";
try {
res= "check1:" + check1 +
" radio: " + radio1 +
" select: " + select1 +
"\nselect2:";
} catch (NullPointerException e) {}
try {
res += select2[0];
for (int i = 1; i < select2.length; i++) {
res += ", " + select2[i];
}
} catch (NullPointerException e) {
res += "null";
}
mav.addObject("msg", res);
mav.setViewName("form2");
return mav;
}
}
form2.html を新規作成する。
<!DOCTYPE html>
<html xmlns:th="http://www.thymeleaf.org">
<head>
<meta charset="UTF-8">
<title>top page</title>
<style type="text/css">
	h1 {
		font-size: 18pt;
		font-weight: bold;
		color: gray;
	}
	body {
		font-size: 13pt;
		color: gray;
		margin: 5px 25px;
	}
	pre {
		font-size: 13pt;
		color: gray;
		padding: 5px 10px;
		border: 1px solid gray;
	}
</style>
</head>
<body>

<h1>form2</h1>

<pre th:text="${msg}">please wait...</pre>
<form method="post" action="/form2" >
	<div>
	<input type="checkbox" id="check1" name="check1" />
	<label for="check1">チェック</label>
	</div>
	<div>
	<input type="radio" id="radioA" name="radio1" value="male" />
	<label for="radioA">男性</label>
	</div>
	<div>
	<input type="radio" id="radioB" name="radio1" value="female" />
	<label for="radioB">女性</label>
	</div>
	<select id="select1" name="select1" size="4">
		<option value="Windows">Windows</option>
		<option value="Mac">Mac</option>
		<option value="Linux">Linux</option>
	</select>
	<select id="select2" name="select2" size="4" multiple="multiple">
		<option value="Android">Android</option>
		<option value="iPhone">iPhone</option>
		<option value="winfone">Windows Phone</option>
	</select>
	<input type="submit" value="Click" />
</form>

</body>
</html>