Gitにコミットする前に、.gitignoreファイルを編集する。
プロジェクト・エクスプローラーの右上の▽をクリックして「フィルターおよびカスタマイズ」を選択する。
「.*リソース」のチェックを外してOKする。
.gitignoreファイルが見えるようになるので、以下の行を追加する。
HELP.md
/target/
!.mvn/wrapper/maven-wrapper.jar
/.mvn/
mvnw
mvnw.cmd

### STS ###
.apt_generated
.classpath
.factorypath
.project
.settings
.springBeans
.sts4-cache
:
:
プロジェクトを右クリックして[チーム]-[コミット]を選択する。
コミットするファイルを選択して、コミットメッセージを入力し、右下の「コミット」をクリック。
Gitリポジトリにコミットされる。
フォワードとリダイレクト
テキストではp.158のリスト3-23に書かれている内容。
ここでは、IndexControllerに追加してみる。
package jp.abc;

import org.springframework.stereotype.Controller;
import org.springframework.ui.Model;
import org.springframework.web.bind.annotation.PathVariable;
import org.springframework.web.bind.annotation.RequestMapping;
import org.springframework.web.bind.annotation.RequestMethod;
import org.springframework.web.bind.annotation.RequestParam;
import org.springframework.web.servlet.ModelAndView;

@Controller
public class IndexController {

	@RequestMapping("/index/{num}")
	public String index(@PathVariable int num, Model model) {
		int res = 0;
		for (int i = 1; i <= num; i++) {
			res += i;
		}
		model.addAttribute("msg", "total: " + res);
		return "index";
	}

	@RequestMapping("/mav/{num}")
	public ModelAndView mav(@PathVariable int num, ModelAndView mav) {
		int res = 0;
		for (int i = 1; i <= num; i++) {
			res += i;
		}
		mav.addObject("msg", "total: " + res);
		mav.setViewName("index");
		return mav;
	}

	@RequestMapping(value="/form1", method=RequestMethod.GET)
	public ModelAndView form1(ModelAndView mav) {
		mav.setViewName("form1");
		mav.addObject("msg", "お名前を書いて送信してください");
		return mav;
	}

	@RequestMapping(value="/form1", method=RequestMethod.POST)
	public ModelAndView send(@RequestParam("text1")String str,
			@RequestParam("text2")String str2,
			ModelAndView mav) {
		int p = (str + str2).hashCode() % 101;
		p = Math.abs(p);
		mav.addObject("msg", "こんにちは" + str + "さん!");
		mav.addObject("result", str + "さんの"
							+ str2 + "度は、" + p +"%です。");
		mav.addObject("value", str);
		mav.addObject("text2", str2);
		mav.setViewName("form1");
		return mav;
	}

	@RequestMapping("/other")
	public String other() {
		return "redirect:/";
	}

	@RequestMapping("/home")
	public String home() {
		return "forward:/";
	}

}
Thymeleafをマスターする
IndexControllerの最後に以下のメソッドを追加する。
	@RequestMapping("/date")
	public String date() {
		return "index";
	}
index.html に1行追加する。
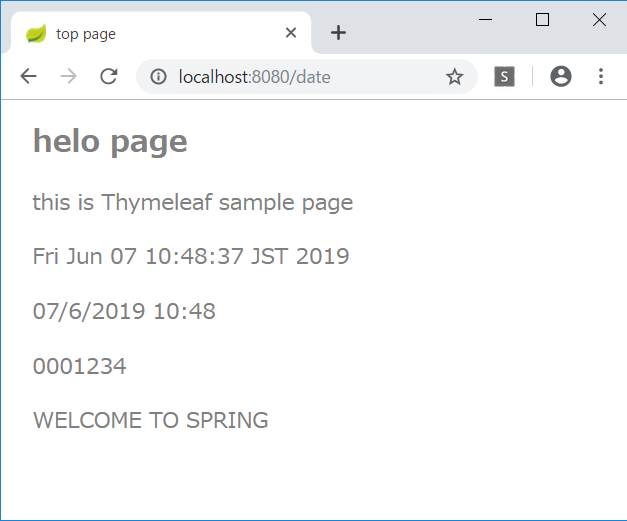
<h1>helo page</h1>
<p class="msg">this is Thymeleaf sample page</p>
<p class="msg" th:text="${msg}"></p>
<p th:text="${new java.util.Date().toString()}"></p>
ユーティリティオブジェクト
Thymeleafにはユーティリティオブジェクトが用意されているので、使ってみる。
index.html に以下の内容を追加する。
<p th:text="${#dates.format(new java.util.Date(), 'dd/MMM/yyyy HH:mm')}"></p>
<p th:text="${#numbers.formatInteger(1234, 7)}"></p>
<p th:text="${#strings.toUpperCase('Welcome to Spring')}"></p>
パラメータへのアクセス
index.html にさらに追加する。
<p th:text="'from parameter... id=' + ${param.id[0]}"></p>
<p th:text="'name=' + ${param.name[0]}"></p>
URLにパラメータを追加すると、その値が表示される。
http://localhost:8080/date?id=12345&name=taro
選択オブジェクトへの変数式
既存のコードが長くなってきたので、新しくコントローラを作成する。
ObjectController.java
package jp.abc;

import org.springframework.stereotype.Controller;
import org.springframework.web.bind.annotation.RequestMapping;
import org.springframework.web.servlet.ModelAndView;

@Controller
public class ObjectController {
	@RequestMapping("/obj")
	public ModelAndView index(ModelAndView mav) {
		mav.setViewName("obj");
		mav.addObject("msg", "current data");
		DataObject obj = new DataObject(123, "hanako", "hanako@flower");
		mav.addObject("obj", obj);
		return mav;
	}
}
HTMLも新規作成する。
obj.html
<!DOCTYPE html>
<html xmlns:th="http://www.thymeleaf.org">
<head>
<meta charset="UTF-8">
<title>選択オブジェクト</title>
<style type="text/css">
h1 {
  font-size: 18pt;
  font-weight: bold;
  color: gray;
}
body {
  font-size: 13pt;
  color: gray;
  margin: 5px 25px;
}
tr {
  margin: 5x;
}
th {
  padding: 5px;
  color: white;
  background: darkgray;
}
td {
  padding: 5px;
  color: black;
  background: #f0f0f0;
}
</style>
</head>
<body>
<h1>選択オブジェクトの変数式</h1>
<p th:text="${msg}"></p>
<table th:object="${obj}">
  <tr><th>ID</th><td th:text="*{id}"></td></tr>
  <tr><th>NAME</th><td th:text="*{name}"></td></tr>
  <tr><th>MAIL</th><td th:text="*{value}"></td></tr>
</table>

</body>
</html>
リテラル置換
obj.html に以下のコードを追加する。
<div th:object="${obj}">
  <p th:text="|my name is *{name}. mail address is *{value}.|">message.</p>
</div>
HTMLコードの出力
ObjectController に以下のコードを追加する。
	public ModelAndView index(ModelAndView mav) {
		mav.setViewName("obj");
		mav.addObject("msg", "current data");
		DataObject obj = new DataObject(123, "hanako", "hanako@flower");
		mav.addObject("obj", obj);
		mav.addObject("code", "msg1<hr />msg2<br />msg3");
		return mav;
	}
obj.html に以下のコードを追加する。
<p th:text="${code}">message.</p>
条件式
IndexControllerの date() メソッドを以下のように書き換える。
	@RequestMapping("/date")
	public ModelAndView date(
			@RequestParam("id")int id,
			ModelAndView mav) {
		mav.setViewName("index");
		mav.addObject("id", id);
		mav.addObject("check", id % 2 == 0);
		mav.addObject("trueVal", "Even number!");
		mav.addObject("falseVal", "Odd number..");
		return mav;
	}
index.html に以下のコードを追加する。
<p th:text="${id} + ' is ' + (${check} ? ${trueVal} : ${falseVal})"></p>